User Guide

About OmniHealth
OmniHealth is a Patient Management System tailored to private clinicians to manage patients’ details, records and upcoming appointments. As a private clinician, you can manage and monitor your patient database all in one location. Utilise OmniHealth’s sorting and filtering system to help you easily manage and find your patients’ details and records of past visits. Also, OmniHealth’s appointment tracker allows you to tag upcoming appointments for each patient.
Get rid of your cabinets of patient files today, and leverage upon OmniHealth’s Patient Management System to help you organise your patient database more efficiently! Just a few strokes on your keyboard, you’ll be able to interact with OmniHealth and enter a world of effective patient management! 💊✨
This User Guide aims to help your business integrate smoothly with OmniHealth, guiding you along with in-depth documentation. It shows you how to start using OmniHealth, essential OmniHealth features, Frequently Asked Questions (FAQ) and a neat command summary for easy reference. So, let’s get started!
Table of Contents
- Installation
- How to Use OmniHealth
-
Features
-
General Commands
-
Viewing help:
help -
Listing all patients:
list -
Listing all records of a patient:
rlist -
Displaying the full list:
showall -
Exiting the program:
exit
-
Viewing help:
-
Patient Commands
-
Adding a patient:
add -
Deleting a patient:
delete -
Editing a patient:
edit -
Finding patients by name:
find -
Clearing all patient entries:
clear
-
Adding a patient:
-
Appointment Commands
-
Adding an appointment:
appt -
Clearing an appointment:
apptcl
-
Adding an appointment:
-
Record Commands
-
Adding a record:
radd -
Deleting a record:
rdelete -
Editing a record:
redit -
Finding records by keyword:
rfind -
Clearing all patient records:
rclear
-
Adding a record:
-
General Commands
- FAQ
- Command Summary
Installation
-
Ensure you have Java
11or above installed in your Computer. Refer to the FAQ for more information on installation. -
Download the latest
OmniHealth.jarfrom our GitHub page. -
Copy the file to an empty folder you want to use as the home folder for OmniHealth.
-
Double-click the file to start the app.
-
Congratulations, you now have OmniHealth installed!
-
Head over to the next section to learn how to use OmniHealth.
How to Use OmniHealth
![]() We highly recommend that you read through this section before moving on to our Features and FAQ sections!
We highly recommend that you read through this section before moving on to our Features and FAQ sections!
This section covers all you need to know to start using OmniHealth. We will go through the essentials to better understand OmniHealth’s layout, navigation and command format.
Layout
When you launch OmniHealth, you will see OmniHealth’s Graphical User Interface (GUI) on your screen. Don’t be overwhelmed, here’s a rundown of the different sections of OmniHealth:
OmniHealth’s GUI:
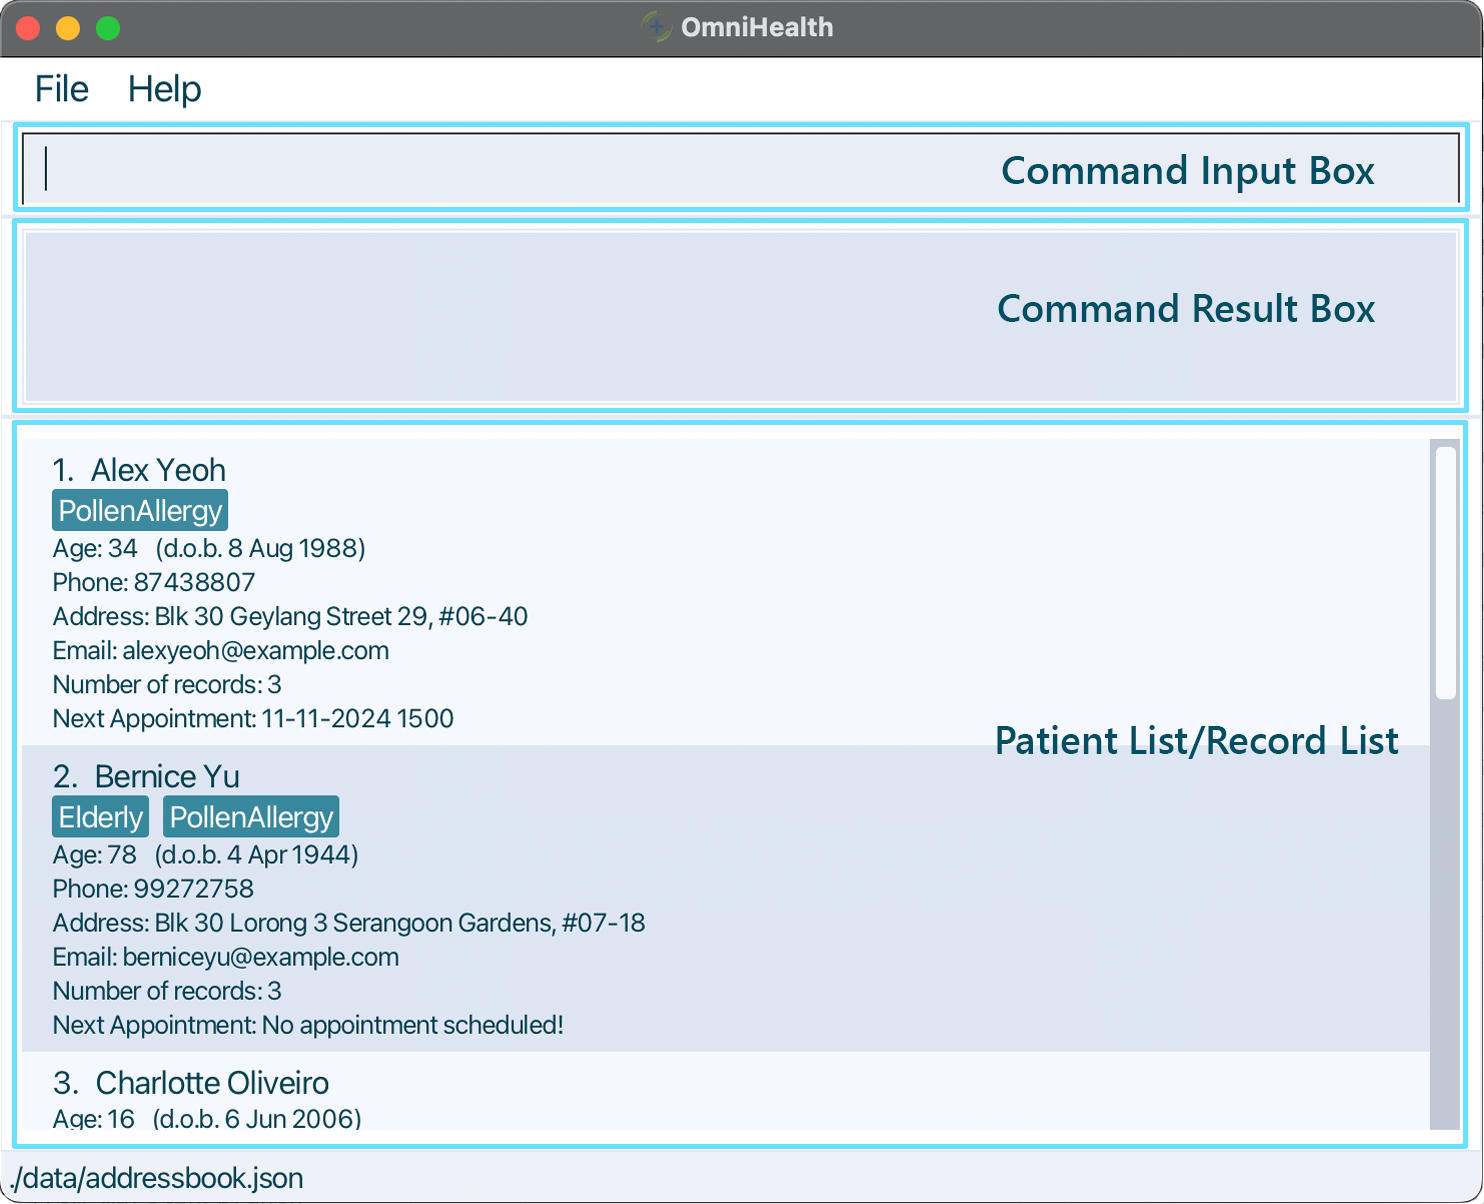
Navigation
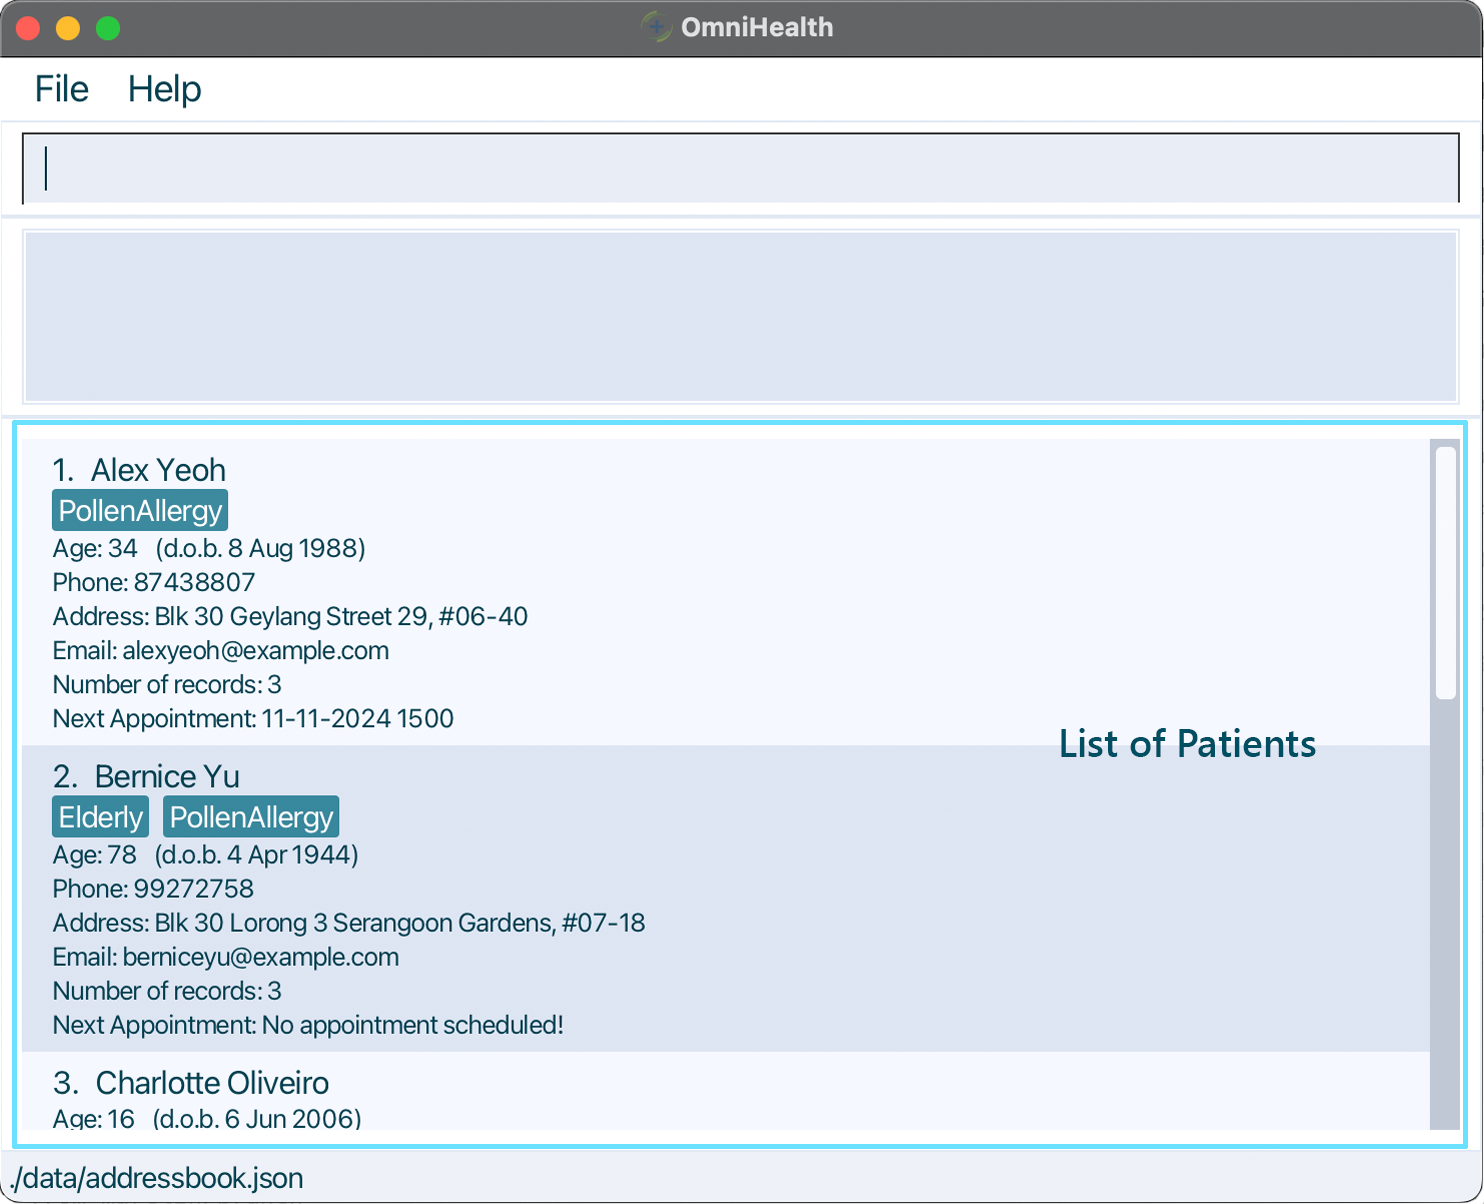
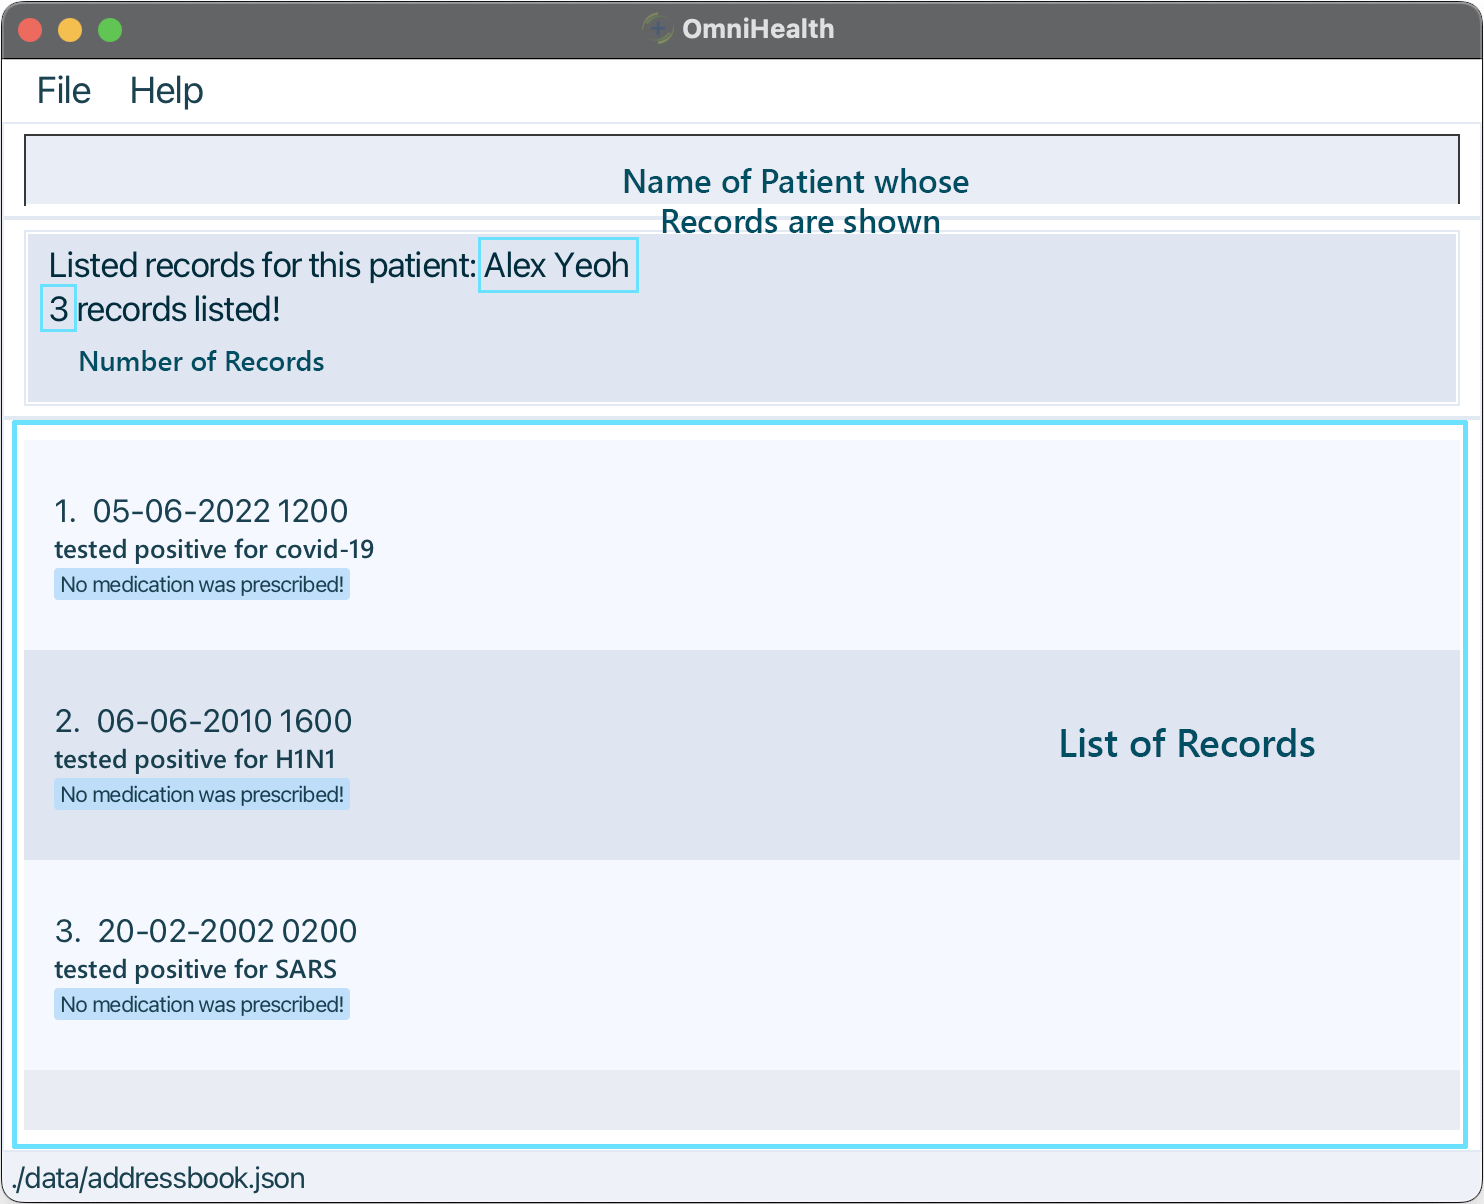
Managing your patient database is made easy with OmniHealth and navigating it is easier! This section covers the 2 viewing modes: Patient List View and Record List View as well as how to exit a search.
Patient/Record List Views
Navigating in between patients and their records is done easily with 2 commands:
rlist and list
Example:
- The Patient List View is OmniHealth’s default viewing mode.
- Typing
rlist 1will enter the Record List View ofAlex Yeoh. - Typing
listwill bring you back to the Patient List View showing all the patients.
| Patient List View (Default) | Record List View |
|---|---|
 |
 |
Command to navigate to this view: list
|
Command to navigate to this view: rlist PATIENT_INDEX
|
rlist and list!
Filtered/Unfiltered List Views
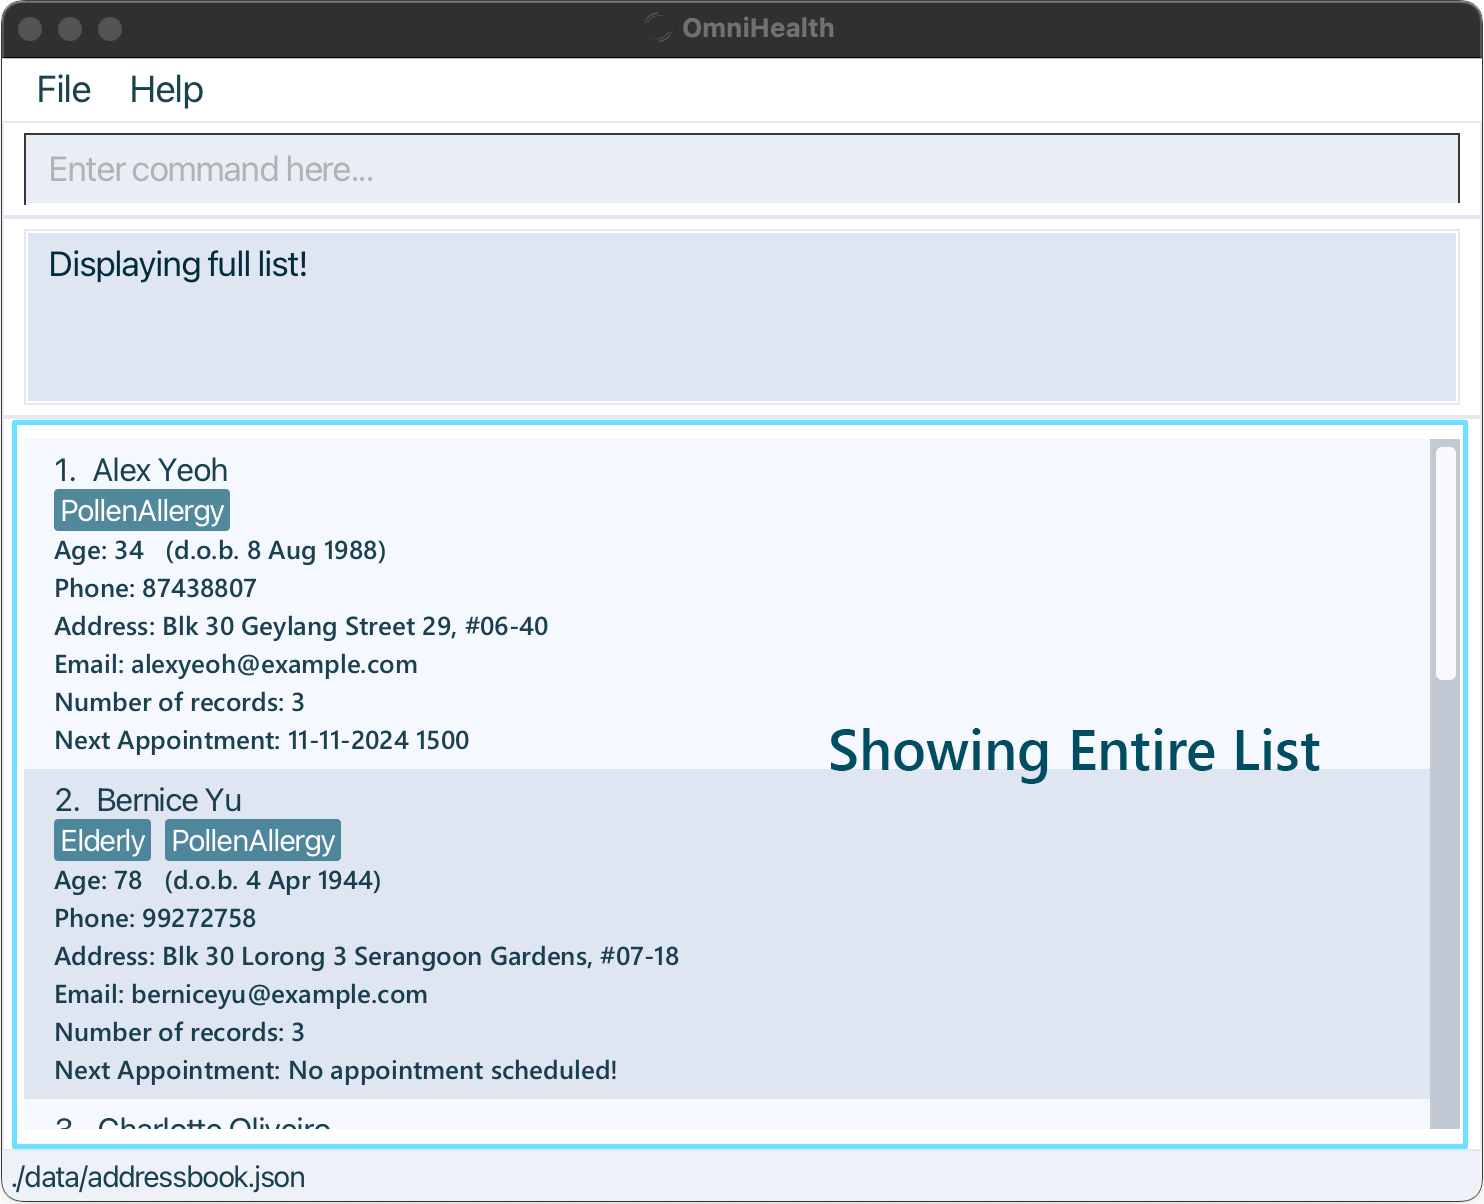
OmniHealth’s sorting and filtering system allows you to search for specific patients and records in each respective list views.
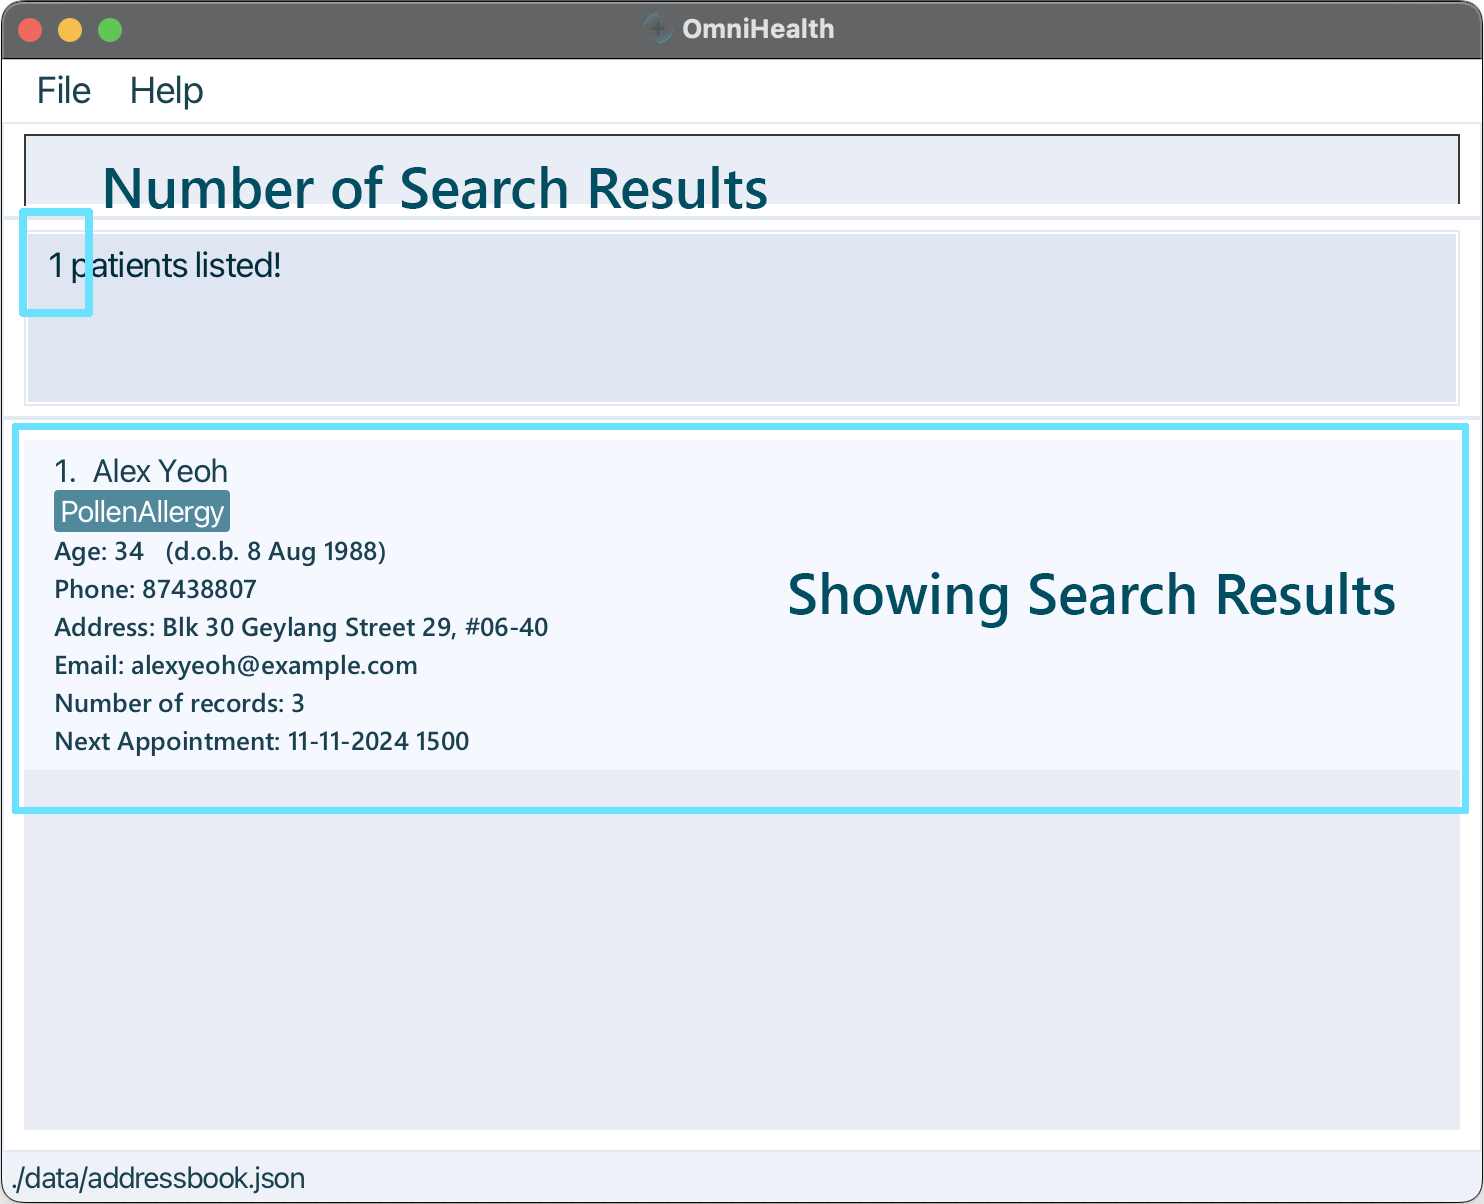
By default, the Patient List and Record List are unfiltered (not filtered by a find command). After using a find command find or rfind, the list will be considered filtered.
Example:
- Typing
find alexwill enter the Filtered List View where only the matching results are shown. - Typing
showallwill bring you back to the Unfiltered List View showing all the patients/records before the find command was executed.
| Unfiltered List View (Default) | Filtered List View |
|---|---|
 |
 |
Command to navigate to this view: showall
|
Command to navigate to this view: find or rfind
|
![]() Note:
Note:showall command can be used in both Patient List View and Record List View
Command Format
Before we introduce more of OmniHealth’s commands throughout this User Guide, let’s first go through the general command format.
Here is an example command radd:

- Command Word: Determines what action you want OmniHealth to execute.
- User Input Fields: Parameters which you input valid data with.
- Flags: Allows OmniHealth to know which user field you wish to input.
Here are some general guidelines for you to better understand the command format for all our features.
| User Input Rules | Description | Example |
|---|---|---|
UPPER_CASE |
Input fields to be supplied by you. |
n/NAME requires an input. |
[SQUARE_BRACKETS] |
Optional input fields that can be omitted. |
[t/TAG] can be left blank. |
... |
Input fields that can be used multiple times including zero times. |
[t/TAG]... can be t/GlutenAllergy, t/DustAllergy t/PollenAllergy etc. |
| Any Order | Input fields can be in any order. |
n/NAME p/PHONE_NUMBER and p/PHONE_NUMBER n/NAME are acceptable. |
| Last Input | If an input field is only expected once, only the last of multiple inputs will be considered. |
p/12341234 p/56785678 will be interpreted as p/56785678. |
| Extraneous Fields | For commands that do not take in input fields, unnecessary input will be ignored. |
help 123 will be interpreted as help. |
Key Definitions
Patient
| Input Fields | Flag | Description |
|---|---|---|
| PATIENT_INDEX | NIL | Index of the patient |
| NAME | n/ | Name of the patient, which accepts alphanumeric characters, and must not be blank |
| BIRTHDATE | b/ | Birthdate of the patient, given in dd-MM-yyy |
| PHONE_NUMBER | p/ | Phone number of the patient, restricted to 5-15 integers |
| e/ | Email of the patient, which needs to be in the format local-part@domain | |
| ADDRESS | a/ | Address of the patient, taking any value but cannot be blank |
| TAG | t/ | Relevant tagging for the patient, which cannot have blanks |
Appointment
| Input Fields | Flag | Description |
|---|---|---|
| PATIENT_INDEX | NIL | Index of the patient |
| APPOINTMENT_DATE_TIME | d/ | Date and time of the appointment, given in the format dd-MM-yyyy HHmm Note: Appointments cannot be set in the past! |
Record
| Input Fields | Flag | Description |
|---|---|---|
| RECORD_INDEX | NIL | Index of the record |
| RECORD_DATE_TIME | d/ | Date and time of the record, given in the format dd-MM-yyyy HHmm Note: Dates cannot be in the future! |
| RECORD_DETAILS | r/ | Details of the record, taking any value but cannot be blank |
| MEDICATION | m/ | Medication prescribed, if any |
Features
This section covers each of the features in detail. Before continuing, please ensure you have read the section on Command Formats!
What you should expect to find:
- A description of the feature
- The format of the command
- The expected behaviour of the feature
- Example usages of the feature
- Important points to note about the feature
General Commands
Some general commands for the application
Viewing help: help
Shows a message explaining how to access the help page.
 Format:
 help
Listing all patients: list
Returns to the patient list from the record list screen.
- The record list screen must be shown for this command to be valid.
Format: list
Listing all records of a patient: rlist
Shows a list of all records for the specified patient.
Format: rlist PATIENT_INDEX
- The command can only be called when the patient list is displayed (after using
list). - Lists all records of the patient at the specified
PATIENT_INDEX. - The index refers to the index number shown in the displayed patient list.
- The index must be a positive integer 1, 2, 3, …
- The index must be within the system limit.
Examples:
-
rlist 1displays all records of the 1st patient in the displayed patient list. -
find Betsyfollowed byrlist 1displays all records of the 1st patient in the results of the find command.
Displaying the full list: showall
Clears search parameters of a find or rfind command to undo the search.
- If the patient list is displayed, the unfiltered patient list will be shown instead.
- If the record list is displayed, the unfiltered record list will be shown instead.
Format: showall
Exiting the program: exit
Exits the program.
Format: exit
Patient Commands
Commands relating to the patient list, such as adding and deleting patients Patient commands can only be called when the Patient List View is displayed (after using
list)
Adding a patient: add
Adds a patient to the patient record database.
Format: add n/NAME b/BIRTHDATE p/PHONE_NUMBER e/EMAIL a/ADDRESS [t/TAG]…
- Patient’s name entered in is case-insensitive.
- Name should only contain alphanumeric characters (eg. s/o is not a valid input).
- Birthdate cannot be after the current date.
- Duplicate patients are not allowed.
Examples:
add n/John Doe b/08-08-1988 p/98765432 e/johnd@example.com a/John street, block 123, #01-01add n/Betsy Crowe b/16-06-1996 e/betsycrowe@example.com a/Ang Mo Kio Ave 5, block 13, #02-033 p/1234567 t/PollenAllergy
Deleting a patient: delete
Deletes the specified patient from the patient database.
Format: delete PATIENT_INDEX
- Deletes the patient at the specified
PATIENT_INDEX. - The index refers to the index number shown in the displayed patient records list.
- The index must be a positive integer 1, 2, 3, …
- The index must be within the system limit.
Examples:
-
listfollowed bydelete 2deletes the 2nd patient in the address book. -
find Betsyfollowed bydelete 1deletes the 1st patient in the results of the find command.
Editing a patient: edit
Edits an existing patient in the address book.
Format: edit PATIENT_INDEX [n/NAME] [b/BIRTHDATE] [p/PHONE] [e/EMAIL] [a/ADDRESS] [t/TAG]…
- Edits the patient at the specified
PATIENT_INDEX. The index refers to the index number shown in the displayed patient list. The index must be a positive integer 1, 2, 3, … The index must be within the system limit. - At least one of the optional fields must be provided
- Existing values will be overridden by the input values.
- eg. when editing tags, the existing tags of the patient will be removed i.e adding of tags is not cumulative.
t/ without
specifying any tags after it.
Examples:
-
edit 1 p/91234567 e/johndoe@example.comEdits the phone number and email address of the 1st patient to be91234567andjohndoe@example.comrespectively. -
edit 2 n/Betsy Crower t/Edits the name of the 2nd patient to beBetsy Crowerand clears all existing tags.
Finding patients by name: find
Finds patients whose names contain any of the given keywords.
Format: find KEYWORD [MORE_KEYWORDS]
- The search is case-insensitive. e.g
hanswill matchHans - The order of the keywords does not matter. e.g.
Hans Bowill matchBo Hans - Only the name is searched.
- Only full words will be matched e.g.
Hanwill not matchHans - Patients matching at least one keyword will be returned (i.e.
ORsearch). e.g.Hans Bowill returnHans Gruber,Bo Yang
Examples:
-
find JohnreturnsjohnandJohn Doe -
find alex davidreturnsAlex Yeoh,David Li
Clearing all patient entries: clear
Clears all patients from Omnihealth.
Format: clear
Appointment Commands
Commands for adding and clearing appointments Appointment commands can only be called when the Patient List View is displayed (after using
list)
Adding an appointment: appt
Adds an appointment for a specified patient. This command is only valid in the Patient List View.
Format: appt PATIENT_INDEX d/APPOINTMENT_DATE_TIME
- Adds a new appointment for the patient under the specified
PATIENT_INDEX, with the given date. - The index refers to the index number shown in the displayed patient list.
- The index must be a positive integer 1, 2, 3, …
- The index must be within the system limit.
- The appointment date cannot be before the current date.
- If a pre-existing appointment is present, it will be overridden by the new appointment.
- Appointments that have passed will not be removed automatically, and require either a new appointment to override
or the
apptclcommand in the next section below to be used. Further development of the appointment feature will be released in future iterations!
Examples:
-
appt 1 d/11-09-2024 1200adds an appointment for the patient with index 1, with a date and time of 11/09/2024, 1200. -
appt 2 d/15-11-2025 1400adds an appointment for the patient with index 2, with a date and time of 15/11/2024, 1400.
Clearing an appointment: apptcl
Clears the appointment for a specified patient. This command is only valid in the Patient List View.
Format: apptcl PATIENT_INDEX
- Clears any appointment under the patient with the specified
PATIENT_INDEX. - The index refers to the index number shown in the displayed patient list.
- The index must be a positive integer 1, 2, 3, …
- The index must be within the system limit.
- The command will return the patient list to its original state, before any filters were applied to the list.
Examples:
-
apptcl 1clears the appointment (if any) of the patient with index 1.
Record Commands
Commands relating to the record list of a patient, such as adding or deleting a record Record commands can only be called when the Record List View is displayed (after using
rlist PATIENT_INDEX)
Adding a record: radd
Adds a new record to a given patient.
Format: radd d/RECORD_DATE_TIME r/RECORD_DETAILS [m/MEDICATION]…
- Adds a new record to the patient with given
RECORD_DATE_TIME,RECORD_DETAILSandMEDICATIONinformation.-
RECORD_DATE_TIMEandRECORD_DETAILSfields cannot be empty.
-
- The record date & time cannot be in the future.
Examples:
radd d/11-09-2001 1200 r/Patient tested negative for COVID-19 m/Paracetamol 500mg m/Dextromethorphanradd d/28-02-2020 2030 r/Patient experienced vomiting
Deleting a record: rdelete
Deletes the specified record from the currently viewed patient’s records.
Format: rdelete RECORD_INDEX
- Deletes the record of the currently viewed patient at the specified
RECORD_INDEX. - The record index must be a positive integer 1, 2, 3, …
- The record index must be within the system limit.
Examples:
-
rlist 1thenrdelete 2deletes the 2nd record from the 1st patient’s listed records.
Editing a record: redit
Edits an existing record in the record list.
Format: redit RECORD_INDEX [d/RECORD_DATE_TIME] [r/RECORD_DETAILS] [m/MEDICATION]…
- Edits the record at the specified
RECORD_INDEX. The index refers to the index number shown in the displayed record list. The index must be a positive integer 1, 2, 3, … The index must be within the system limit. - At least one of the optional fields must be provided.
- Existing values will be updated to the input values.
- When editing medication, the existing medication in the record will be removed i.e adding of tags is not cumulative.
- You can remove all the specific record’s medications by typing
t/without specifying any tags after it.
Examples:
-
redit 1 d/12-12-2012 1200Edits the date of the 1st record to be12-12-2012 1200. -
redit 2 r/Fever m/Edits the data of the 2nd record to beFeverand clears all existing medication.
Finding records by keyword: rfind
Finds all records that match the search constraint provided
Format: rfind [d/RECORD_DATE_TIME] [r/DATA] [m/MEDICATION]
- The search is case-insensitive. e.g
h1n1will matchH1N1 - The order of the keywords does not matter. e.g.
r/Has SARSwill matchSARS Hasstored in record data - Only full words will be matched e.g.
Covidwill not matchCovid-19. - The order that the fields are specified does not matter. eg.
r/SARS m/Panadolis equivalent tom/Panadol r/SARS - FLAGS specify the field of a record that the keywords will be matched to.
- If the specified field of a record contains at least one matching keyword, the record is returned.
- e.g.
m/Paracetamol Benzonatatewill return records with medications ofBenzonatate Benzonatate,Paracetamol Paracetamol.
- Specifying more FLAGS increases the constraint of the search.
- If all fields of a record that is specified by the FLAG contains at least one matching keyword each, the record is returned.
- e.g.
r/Covid-19 m/coldwill only return records that contains bothCovid-19in record data andcoldin record medication.
Examples:
-
rfind r/Covid-19returns a record withCovid-19andContracted covid-19stored in its record data field. -
rfind r/cold d/10-2022returns a record that matches bothcoldin the record data field, and has a date within Oct 2022.
Clearing all patient records : rclear
Clears all records of a specific patient from Omnihealth.
Format: rclear
Saving & Loading
Useful information relating to saving and loading of patient data
Saving the data
Patient’s data are saved in the hard disk automatically after any command that changes the data. There is no need to save manually.
Editing the data file
OmniHealth’s data are saved as a JSON file [JAR file location]/data/patientlist.json. Advanced users are welcome to update data directly by editing that data file.
FAQ
Q: My computer doesn’t have Java 11! How can I install it?
A: You can find the details of this on Oracle’s website,
where there is a comprehensive guide on how to install Java for most existing operating systems.
Q: How can I transfer my data to another Computer?
A: First, locate the data file as described by the section editing the data file. After installing the application in
your new computer, transfer the old data file into the folder [JAR file location]/data/. If an existing patientlist.json already exists,
choose to overwrite the file. You can now open the application in the new computer and your old data will be there!
Q: Is there a limit to the number of patients/records that I can add?
A: There is a limit of patients and records of about 2 million patients/records. This limit may be expanded in the future if necessary.
Q: Do I need an internet connection to use OmniHealth?
A: All of OmniHealth’s functionality can be used offline! No internet connection is required.
Q: Is my data stored on the cloud?
A: Unfortunately, there is no cloud saving compatibility currently supported by OmniHealth. However, you can still utilise various
free services such as Google Drive to store your data online if you wish!
The data file can be found in the JSON file under [JAR file location]/data/patientlist.json.
Command summary
| Action | Format, Examples |
|---|---|
| Help | help |
| List Patients | list |
| List Records | rlist PATIENT_INDEX |
| Show Unfiltered List | showall |
| Exit Program | exit |
| Add Patient |
add n/NAME b/BIRTHDATE p/PHONE_NUMBER e/EMAIL a/ADDRESS [t/TAG]… e.g., add n/James Ho b/12-12-2000 p/22224444 e/jamesho@example.com a/123, Clementi Rd, 1234665 t/DustAllergy
|
| Delete Patient |
delete PATIENT_INDEXe.g., delete 3
|
| Edit Patient |
edit PATIENT_INDEX [n/NAME] [b/BIRTHDATE] [p/PHONE_NUMBER] [e/EMAIL] [a/ADDRESS] [t/TAG]…e.g., edit 2 n/James Lee e/jameslee@example.com
|
| Find Patients |
find KEYWORD [MORE_KEYWORDS]e.g., find James Jake
|
| Clear Patients | clear |
| Add Appointment |
appt PATIENT_INDEX d/APPOINTMENT_DATE_TIME e.g., appt 1 d/01-01-2023 1230
|
| Clear Appointment | apptcl PATIENT_INDEX |
| Add Record |
radd d/RECORD_DATE_TIME r/RECORD_DETAILS [m/MEDICATION] e.g., e.g., radd 1 d/2022-09-11 r/Patient tested negative for COVID-19
|
| Delete Record | rdelete RECORD_INDEX |
| Edit Record |
redit RECORD_INDEX [d/RECORD_DATE_TIME] [r/RECORD_DETAILS] [m/MEDICATION]…e.g., redit 2 d/12-12-2012 1200 r/Fever m/Paracetamol
|
| Find Record |
rfind [d/RECORD_DATE] [r/RECORD_DETAILS] [m/MEDICATION] e.g., rfind d/10-2022 r/Covid-19 m/Panadol
|
| Clear Records | rclear |